


")


Implantable Port for Chemotherapy in Tunisia
Implantable ports for chemotherapy are available for purchase in Tunisia. The main advantage of an implantable port is that it eliminates the need for repeated venous punctures, simplifying treatments such as chemotherapy and reducing patient discomfort. After treatment, the port can be removed via a minor surgical procedure.
This device allows blood samples to be drawn and medications to be administered without damaging the veins. It significantly improves the quality of life for patients requiring long-term care.
Needle Insertion and Removal on an Implantable Port
Checking Equipment and Choosing the Needle
Before insertion, if the device used by the patient differs from the one used in the facility, it is essential to verify the needle’s equivalent length. The choice should depend on the depth of the port and the patient’s weight. This decision must be reconsidered in cases of significant weight change.
Evaluating the Insertion Site
Inspect the skin around the port, palpate the site, and ask the patient about preferences. Topical anesthesia is recommended and should be administered 45 minutes prior to the procedure to ensure effectiveness.
Preparing the Medical Equipment
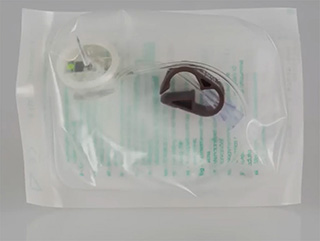
Essential Materials
- Dressing kit
- Sterile drapes
- Sterile gloves
- Huber needle adapted to the port depth
- Antiseptic solution
- Sterile compresses
- Transparent sterile dressing
- Irrigation syringe (NaCl or heparin, per protocol)
Intervention Cart Preparation
- Alcohol-based hand solution (with 2% chlorhexidine)
- Perforated sterile drape
- 10 ml or 20 ml syringes
- Cap, dressings, masks
- Washcloth, soap, towel
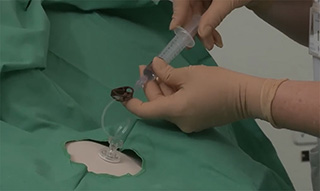
Steps for Inserting the Needle into the Port
Preparation
- Wash your hands and prepare a sterile field
- Put on sterile gloves
- Disinfect the skin using the triple-wipe technique
Needle Insertion
- Locate the subcutaneous reservoir
- Insert the needle perpendicularly into the membrane
- Secure the needle and cover it with a transparent dressing
- Inject 2–3 ml of saline to check for reflux
- Flush thoroughly using a 10 ml syringe
Technical Notes
A 10 ml syringe is recommended for improved reflux sensitivity and effective flushing. Avoid excessive pressure to prevent needle damage.
Steps for Needle Removal
Removal Procedure
- Wash your hands and wear gloves
- Disinfect the site
- Carefully remove the needle perpendicularly
- Apply a dry compress
- Apply a sterile dressing if needed
Maintenance and Infection Prevention
Flushing and Patency Check
Connect a 10 ml syringe filled with saline (NaCl). Verify patency and reflux, then flush with 20 ml of saline in two 10 ml pulsatile injections. End with a positive pressure lock technique.
Dressing Removal
- Gently lift the dressing and wings from the skin
- Stabilize the site with your non-dominant hand
- Withdraw the needle by pulling on the wings until the safety lock engages and a green indicator appears
Post-Removal Care
Disinfect the puncture site with an alcohol-based antiseptic. In case of bleeding, apply a sterile compress for 2–3 minutes, especially for thrombocytopenic patients. Cover the site with a protective dressing and sanitize your hands.
Potential Complications and Recommendations
Although reliable, implantable ports may involve complications such as infection, thrombosis, or incorrect needle positioning. It is crucial to follow established protocols and monitor the site regularly. Patients should be informed of early warning signs to report promptly: redness, swelling, pain, or fever.